Hello and welcome back for Part 5 in our series about getting started with your nature journaling practice! For previous posts and other resources, click here.
Now we finally find ourselves at the entry about drawing. Before we dive into technique, I want to recap a few key ideas:
1. Nature Journaling is MORE THAN a pretty picture – When we nature journal, it is more than just a drawing. Words and numbers play a key role in communicating out observations and the connections we are making with the world around us.
2. Pencil Miles make a BIG difference – Practice may not make perfect, but it certainly makes us better. With drawing (or anything else), the more you do it, the more comfortable you become. In the nature journaling community, John Muir Laws and many others often use the term “pencil miles” to describe this idea.
3. You don’t need fancy resources – To nature journal, you really only need three things: paper, something to write with, and a nature nook to observe. In a future post, I will share the resources I use to journal in the field and why, but when you’re starting out it is best to keep it simple. Plus you can always add on later.
Ways to Add Drawing To Your Nature Journal
Now depending on where you are in your nature journaling practice or even what your schedule allows, there are different ways to add drawings to your nature journal page. So here are a few fun ones to try out.
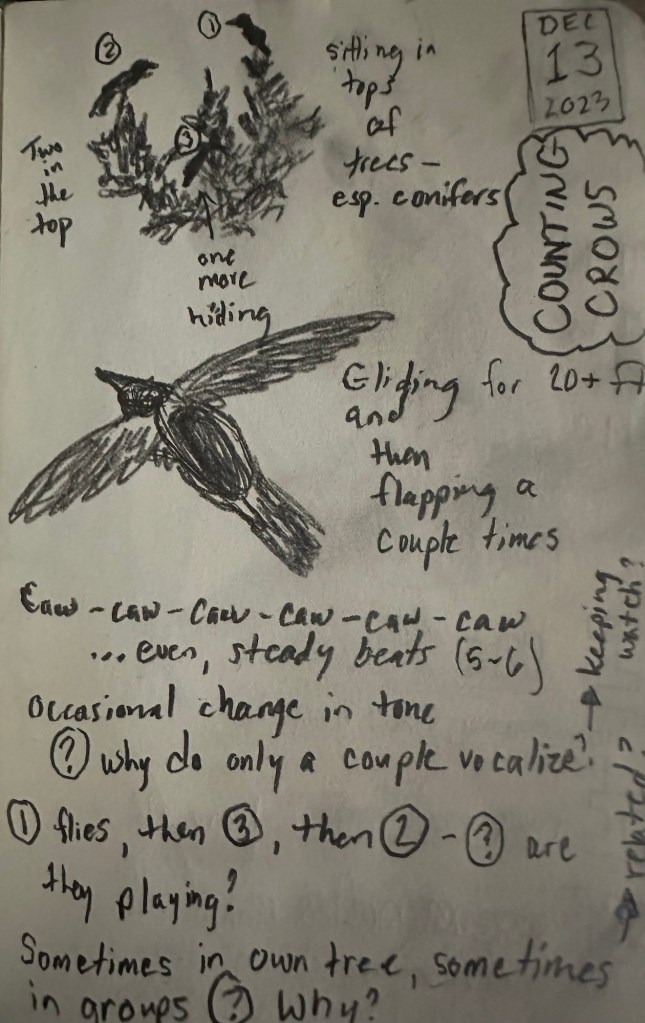
Quick Sketch
Maybe you don’t have much time (pencil inches are better than no pencil time at all!) or maybe the thing you are trying to capture is on the move like a bird. Either way, it is ok to just include a sketch that shows key features like size, shape, or color. You can always add more detail later (see below) or it gives you a chance to at least capture something about what you have seen. I often use this strategy when sketching on a break from work or if the conditions outside are a bit rough. I do often take the time to record specific details in writing or with numbers, knowing I can always adjust the drawing later.
Detailed Drawing
When you have more time or perhaps are working from a reference photo, a detailed drawing can add a lot more to your journal entry. When you take the time to look closely at what you are drawing, you notice more. When you notice more, it leads to new and interesting observations and connections. You are more present in your environment and more likely to notice other fun things around you. Those details can also be more helpful if you are trying to identify something you have seen. For example, if you are drawing a leaf, characteristics like shape, arrangement, vein pattern, and edges can all provide valuable information that helps you tell one species from another.

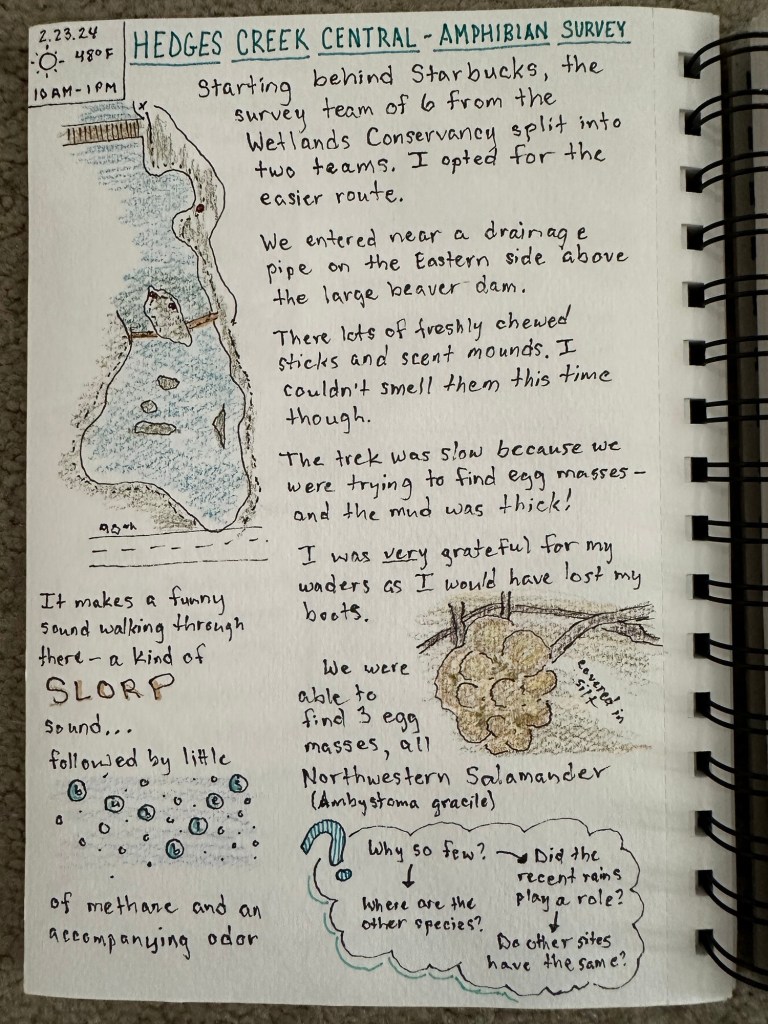
Map
This can be a fun way to include a drawing in your journal. It might show the path you took on a short hike or a longer road trip. Either way, it can help you connect the other information on the page with data about where you saw it. It can even be used with a number or color code to connect words or numbers on your page more clearly. This is a strategy I admittedly have not used much, but hope to use more in the future.
Other strategies to remember
As you begin to draw more as part of your nature journaling practice, here are a few more helpful hints.
1. Look for shapes – Circles, triangles, rectangles… a lot of the things we observe in nature are rooted in basic shapes. For example, when drawing a bird, it can be helpful to use ovals to sketch out the head, body, and upper part of the wing.
2. Use your pencil/hand to measure – Using your pencil or hand to get a sense of proportion (how big one thing is relative to another) can be useful when trying to add depth or perspective to your drawing. It also gives you a sense of how each part should be scaled – how much of the tree trunk is exposed before the branches start? How far do they reach out from the tree? What is the distance between root and crown? Obviously taking precise measurements when possible will always give you more accurate information.
3. Start with light pencil – When you are drawing/sketching, it can always be nice to start with light pencil strokes. First, because they are easier to erase when you need to make a change. But they also allow you to get a sense of the shape in a more general and loose way. While any pencil will do, I like using my Prismacolor Col-Erase Non-Photo Blue pencil for initial sketches whenever possible for exactly the reasons I mentioned.
What’s Next?
So now we’ve talked about the general features of a nature journal and finding a place to observe, but how do we start setting up our page? In our next post, we’ll talk all about the wonderful world of metadata – what it is and why you should include it as part of your nature journal practice.
Until then, happy journaling!

One thought on “Getting Started With Nature Journaling – Part 5: Sketching It Out and Drawing It In”