Getting Started With Nature Journaling – Part 3: Words, Words, Words

Hello and here we are at part 3 of our series about getting started with Nature Journaling. So far, we’ve talked about a general overview of the practice and how to find your nature nook outdoors (or indoors – if needed). Which brings us to some of the practice of journaling itself – starting with today’s topic: how to include writing as part of your practice.

More Than A Pretty Picture

Now I know you might be thinking, why not start with drawing strategies? And honestly, it’s because I think it is the drawing that often holds us back. But chances are, we can write SOMETHING. After all, we spend time in school learning our ABCs and how to write – in fact we often learn various formats for writing in the process. And when we add writing in different formats as part of our practice, I think it adds a little extra sparkle… and a way to have fun in the process!

What kinds of writing could we include?

When I first started nature journaling, I often found it looked quite a bit like my travel journals, with what I would refer to as a “wall of text”. And that is definitely an option, especially if that is comfortable for you as you start your practice. But, the more I journaled, the more I wanted to try new things. So here are a few ways to add a little written flair to your journal pages.

1) Titles – This is not something I always included early on (and sometimes still don’t), but I find it makes it much easier to find an entry when I’m flipping through my journal. As you probably guessed, a title is telling you – or someone you choose to share your work with – what they are looking at. It can also give focus or theme to your journal page.

But it doesn’t have to be the first thing you add. I often leave a blank space or the top, side, or bottom of the page, depending on my format, to add a title at the end or when I hit a little rut with the rest of the work. It also gives you a chance to play with new font styles or to add a little drawing with a frame or banner (both tricks I picked up from sketchnoting practice). A title can even be an extension of your art of the rest of the page.

2) Headings – Headings and sub-headings can help emphasize key information or how it is grouped on the page. It might be the name of a specific plant/animal you’re focused on, a new location, or another detail that helps again make it easier to find information when you look back at it. And they don’t have to fit in neat little boxes either – you can write a heading vertically, horizontally, diagonally, or any way that works for you.

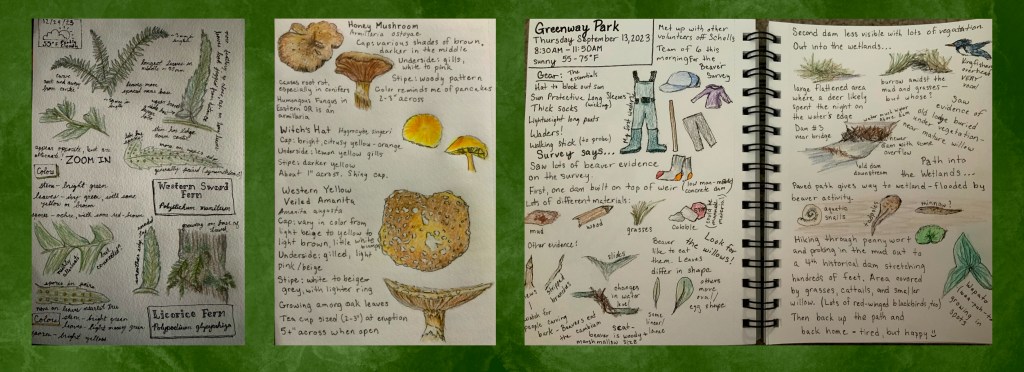
3) Labels – Labels help point out those key details and also can provide a chance to connect structures and vocabulary (not required, but again can be an unexpectedly fun part of the learning experience). I often like to use labels to highlight details that were important for me in identifying what I was looking at. And because nature journaling is a learning process, be prepared to make mistakes when naming something. I completed two pages about fungi I had seen on walks around my neighborhood using the term “stem” to refer to the structure of a mushroom between the cap and the ground, when apparently the correct term is “stipe”. And I left the previous pages as is because honestly, I think it is a great way to track my learning as a naturalist, a nature journaler, and a human.

4) Description – I would say description could be similar to or even part of a label, depending on your approach. But descriptive writing is part of why I often write before I do the bulk of my drawing. One, it helps me get a sense of how I want to layout my page. Two, I can capture a lot of key details quicker in writing than I can in drawing (though I am working on that).

It might include numbers (which we’ll discuss in the next post), but it could also include color, location, or shape. Using sensory information like what you see, hear, smell, feel, or taste can be great for adding descriptive writing (NOTE: Please use safety first – don’t taste the nature unless you are 100% certain – there are some dangerous lookalikes in the plant world- even touch or smell can be risky depending on your sensitivity).

5) Narrative – Tell a story! Where are you? How did you get there? What are seeing? This is one of the forms where it can be fun to be creative. What might a day look like in the life of the plant/animal in front of you? Nature journaling is always going to be more fun if you play with ideas once in awhile.

6) Ask Questions – I will go into more detail on this practice in a later post, but asking questions in our journals can be another fun element to include. In fact, you can even spend an entire page just asking a series of questions about a phenomena that you observe. And in nature journaling – there is no requirement to find the answer! You certainly can and may want to leave space on the page to pursue them later on, but it’s okay to just be curious now and then.

7) Poetry – When I am looking for something new in my nature journaling – or sometimes just by chance – I like to include poetry. Maybe a scene or encounter moves me to write about it. As with many other ways of writing, it can be fun to try new forms of poetry. I almost exclusively used AB rhyme schemes when writing poetry for a long time. Now I write a lot more freeform, though occasionally I will throw in a haiku.

Write That Down

My number one recommendation for writing as part of nature journaling is to let the experience guide you. Write about what stands out to you in the format that feels comfortable. And of course, have fun!

Next time, we’ll chat about how we could incorporate numbers into our nature journal practice. Hopefully I can count on you to join me!

Happy Exploring,

Kirsten

Getting Started With Nature Journaling – Part 2: Find Your Nature Nook

Hello and welcome back for part 2 of my series about Nature Journaling (check out Part 1 here for a general overview) !

With the practice of nature journaling, before we can do the work of journaling, we have to find some nature. So today’s post covers a few different suggestions for how to find nature near you.

Option 1: Find Your Nature Nook

As someone who primarily journals in urban/suburban settings, I would suggest you start by finding your own nature nook. To me, a “nature nook” is a space that is 1) within walking distance from where you live, 2) accessible to you (do not go into unsafe areas or trespass!), and 3) is regularly home to living things. Other journalers often refer to this practice as finding a sit spot.

Revisiting your nature nook over and over can add layers to your nature journaling practice, while also helping you connect with the environment around you and the annual cycles it goes through. I would recommend finding a place that catches your curiosity, whether your drawn by the chatter of birds, a small grove of trees, or the mosses embedded in the bricks or sidewalk.

For maximum health benefits, a greener space is better and you are more likely to notice macro-changes throughout the year. But the reality is that over 100 million people in the United States currently do not have access to a green space within a 5 minute walk from their home – If you’d like to learn more, check out the Outdoors For All Act. So start with your own little nature nook – whether outside your back door or down the street.

Option 2: Park It

For some, accessing a local park, arboretum, or wildlife refuge is an easy task. These green spaces are open to the public and often times free (check before you go – some parks are starting to charge for parking). Some of these spaces will have dedicated areas for wildlife viewing, including places to sit and rest while you journal. They can also be a great space to encounter new species if you are working on a life list as a birder or naturalist.

Many larger parks offer a variety of trails that can be explored, often with access to different ecosystems within a short distance. It is important to remember to practice “Leave No Trace” principles in these – and any other settings – especially sticking to established trails and cleaning up trash. It is the responsibility of each of us to help take care of these spaces so that others can enjoy them and to keep the plants and animals who live there safe and healthy!

Option 3: Find a Connection

Depending on where you live, there may be local nature journaling groups or conservation/stewardship organizations that help bring people into safe outdoor environments. The Wild Wonder Foundation has a list of some clubs (here), but other opportunities may be offered through community centers, parks and rec departments, and more.

If you are able to connect with a local organization, you also might have the chance to engage in some citizen science or stewardship projects. And these can lead to other opportunities that you might not have expected. For example, I joined a local group focused on Wetlands for a beaver survey, which I chose to journal about after returning home. This experience helped me make a connection that became my first official nature journaling outing in partnership with that organization. Be open to the possibilities!

Option 4: Stay Inside

For a variety of reasons, you may not be able to get outside to nature journal. And that is okay! Even indoors there are a number of ways to learn about our environment and get those pencil miles in.

1) Bird Feeders – Maybe you already have a bird feeder… Or if you have internet access, you can check out one of the bird cams hosted by Cornell Lab of Ornithology. Either way, birds will always be in search of food and watching their behaviors can provide great opportunities to quickly make observations and sketches. It can be fascinating to notice who goes for what type of food, which species look similar or different from one another, and even to begin to notice their unique personalities.

2) Windows – Take a look outside your window…what do you see? What can you hear? The world is constantly changing and even looking out a window can give us something to journal about. In fact, there are some nature journalers who regularly paint/draw the sky each day. Think of the differences in color between sunrise, midday, sunset, and twilight… even more so if there are clouds! The world is a beautiful and dynamic place if we pause long enough to take it in.

3) Check out your kitchen – This can be an especially fun practice during a rainy day. Find a fresh fruit or vegetable and draw that. Take some time to learn more about it. Whether you enjoy it for a meal or not, looking more closely at broccoli can open a whole new world – especially when you learn that it is related not only to cauliflower, but to cabbage and kale as well! Fruits and vegetables often have a variety of uneven surfaces which can be great practice for light and shadow.

So You’ve Found Your Nook, What Now?

Once you’ve found your nature nook, inside or outside, it’s time to talk about the journaling part. Stay tuned for the next post about ways to bring different forms of writing into your journaling practice.

Getting Started With Nature Journaling – Part 1: What is Nature Journaling?

For the New Year, I decided to start a series of posts about starting nature journaling. But before we dig into the tips and tricks, I figure it is best to start with a short explainer.

What is Nature Journaling?

Often times, when people think of nature journaling, they tend to think of detailed drawings, accompanied by deep prose and poetry or detailed data collection. But in reality, it is so much more than a pretty picture. It is a way of capturing the things that make us curious, that bring a sense of joy and wonder, and what we learn in the process. And truthfully, there is no “right way” to do nature journaling, though it does often have some common features.

In the community, nature journaling is often described as the practice of recording observations about nature through words, pictures, and numbers. But what could that look like?

Start With Observations

While we often think of nature journaling as the same as it’s visual end-result, it is important to remember that it should begin with observations. Which means we first need to get outside (though I will talk more about this in a later post). I think it can be tempting to rush to put pen or brush to paper, but we can miss so much with this approach. Instead it can be helpful to just take a moment to pause and take in what is around you. Without taking the time to observe, we miss out on all the incredible things around us and maybe some fun journaling opportunities in the process.

Write That Down

Again remembering that there is no “right” way to do this, I often like to start with taking written notes on the page. Mostly because I am still a much quicker writer than artist (though I am working on my live journaling). Also, it allows me to capture a lot of the key details that will be used for other parts of my journal entry. There are obviously lots of different forms that writing might take, including:

  1. Title
  2. Headings
  3. Labels
  4. Description
  5. Narrative
  6. Poetry

Regardless of the form(s) we use, writing can add much needed detail to our entries for ourselves and others, should we choose to share them.

Let Me Count The Ways

For a lot people I have encountered, using numbers in nature journaling is not something they immediately think to include. But for me, collecting specific data can be one of the more interesting elements to look back on and to share with others. Additionally, there are lots of different ways to do this:

  1. Count – How many are there?
  2. Measure – How big (or small) is it?
  3. Time – A very important aspect, which often appears as part of our metadata.
  4. Organize it – make a table or graph to help show visual connections between the data

Pencil It In

For me, my drawings are often the last piece I finish, but the first to be started. During the winter months (which here are often the rainy and cold months), I try to get a general map of my page down while in the field, but add details at home where it is warmer and drier. But like the other two aspects of nature journaling, drawings in a nature journal can take on lots of different forms.

  1. A quick sketch – everything does not need to be detailed and hyperrealistic. Quick sketches can communicate lots of information in a short amount of time.
  2. A detailed drawing – For other entries, we may want to include more detail – especially when used with the other two formats.
  3. Map It – When trying to capture information about a path taken, including a map can provide valuable information.

Next Steps…

As this is only the first entry in the series of posts, stay tuned for future posts about how to start your nature journaling practice!

Reflections on a New Year – 2024

Another New Year has arrived. In the past year, I have encountered a number of changes and know that the new one will likely be equally full of exciting adventures. Like so many others, I find it often is a time to reflect on the opportunities. So without further ado, here are some of my hopes for 2024…

  1. Teach my first formal nature journaling class.

While I have taught nature journaling skills to my students, in 2024 I hope to teach my first nature journaling class to members of the community. There is a good chance I will reach this goal early in the year and if all goes well, be able to teach more later in the year. Of course, I look forward to sharing this experience.

2. Journal at least once a week

In the past, I have made the goal to draw every day. While I certainly aspire towards this, often times I think life can get in the way. By setting a goal of journaling weekly, it feels much more achievable. Though I, of course, will fit in as many pencil miles as possible.

3. Try something new every month.

One sub-goal of this is that I would like to work on both my colored pencil and watercolor skills. I have sets of both and want to learn to better utilize them. The image in the header of the page was my first experiment using my new mixing 6 set from Beam Paints and sketches based on past nature journal entries. I see this goal as very much rooted in the idea of play and not perfection. Learning doesn’t always mean only what worked well. But sometimes it helps us figure out how to do something cool along the way.

4. Grow as a Naturalist

Later in the month of January, I am going to start my training as an Oregon Master Naturalist (an experience I will share more about in a later post). I am hoping this formal program will help me learn more about our local ecosystems and our place within them. But I also know that this was going to continue to be part of my nature journaling practice. I love having a space to record the things that I learn about the plants and animals I share my surrounding area with. My journal also gives me a place to look back on.

5. Embrace imperfection.

I have struggled with the desire for things to be “perfect”. And admittedly, it had prevented me from embracing new experiences or sharing my work or ideas more broadly. So in 2024, I’m challenging myself to embrace the mistakes and their role in the process of learning. This was a message that was always important in my classroom and it’s time to walk the talk.

6. More green time, less screen time.

Prior to the start of the COVID pandemic, I was very active outside (I did half marathons and would hike/walk everywhere I could). But often, I rushed through these moments – trying to beat personal records or set a best time for an event. But since 2020, I have been learning to embrace slowing down and being more present. Being in green spaces is calming and centering. The more time I spend outside, the more I notice about the world around me. I also hope that I am able to help create experiences for people in my community to connect with nature and each other.

I’m sure these goals will shift and new ones will emerge as the year continues. And I look forward to sharing what I learn along the way here on the blog.

Cheers to 2024!

The Joy and Wonder of Nature Journaling

Though I may not always have thought of myself as an artist, I think I have always thought of myself as someone who nature journaled – even if I didn’t name it in that way.

Pencil Miles

One of my earliest memories of writing was in a small journal, white with little pink flowers, about my observations. I was only 5 or 6 at the time, struggled with spelling, and depicted what I was seeing in very large drawings without much detail. But what those pages contained where sketches and noticings about the plants my family and I were attempting to grow on our apartment balcony. There weren’t many specifics, but the spirit was there. I do remember even capturing some data about our plants being invaded by aphids and mites (I unfortunately am not currently green thumbed- but aspire towards that skill).

As I grew older, I would often take a sketchbook along on trips, and capture landscapes and animals that I saw along the way, which my mom also did and would share sketches and techniques with me. She would also graciously let me use her Prismacolor pencils when we returned home when my crayola set didn’t quite have the right shade. Though I had no concept of the idea, by glancing through the pages, one could see the impact of what John Muir Laws and the nature journaling community refers to as pencil miles. Simply put, the more we draw, the more we learn and improve in our skill.

Now by no means is that a linear process… Sometimes a drawing just doesn’t quite turn out the way we imagined. But that doesn’t mean that something was not gained in the process. While working recently on a series of drawings of fungi I have seen in my neighborhood, I found myself far too heavy handed with my micron pen. But I did layer the shades of yellow on the witch’s hat mushroom well, even if the gills were now too bold. The experience also led me to the knowledge that micron pens came in other colors – offering the option to experiment more in the future.

Joy and Wonder

While I appreciate that nature journaling gives me a way of tracking my progress as an artist, that is not the main reason I have found for engaging in the practice. Like many in my suburban neighborhood, before the pandemic struck, I was fairly active outside (I walked half marathons for fun several times a year), but typically would go outdoors, pop in my headphones, and rock out to music. The goal was often to go further and faster than I had done previously.

However, when I suddenly found my school shut down and myself and others in front of a screen for hours on end, my goals for being outdoors shifted in response. I wanted a break from my phone, my screen, and definitely from my headphones which at times caused my ears to ache. And with the shift, my experience of walks in my neighborhood changed dramatically.

I was present…

Suddenly, I started to notice that there weren’t just Mallards and Canada Geese in the wetlands. There were pintails, northern shovelers, gadwalls, and mergansers. I noticed the nutria kits scurrying into the reeds along the edge of the water while their parents stood guard. Without my music blasting, I began to recognize the calls of birds, to be able to track them using multiple senses. I was able to enjoy and appreciate the beauty of wind rustling through the cottonwoods, the tree frogs croaking on a rainy day, or the gentle tapping of nuthatches in the woods.

I was able to notice the shifting colors through the year. Not just from summer to fall – when the veins of the leaves began to be traced with yellow and orange and red, some changing from the center and others from their edges. I began to see subtle shades of brown and pink and gold that indicated mushrooms, along with the changes in the soil before they emerged. The blooming of flowers that I recognized and others that I didn’t.

I began to notice all of the different shapes. That even on the same plant, there was variety in leaf shape or bark structure. I noticed where the birds would often hang out or where the mosses and lichens grow (it’s not on only one side of the tree). Out in nature I felt as though I could breathe. That these walks were no longer about rushing through to get to the next activity, but to take my time and see what nature would share that day.

These experiences inspired my art – challenging me to better capture what I was noticing, wondering, and reminded of. It brought out the curious scientist in me – collecting data about where the bullfrogs were, where a specific flower bloomed, and estimations of tree height and size. My journal became as important to me as my camera, though I still often journaled at home rather than in the wild.

It also led me to seek out community and learning opportunities. If you’ve ever had an interest in nature journaling, I highly recommend the Wild Wonder conferences. I was able to attend both the Nature Journaling for Educators and Wild Wonder conferences this year. And for those who may not be able to attend such events live – due to work or life – they offer digital access as well, which I found helpful. There is also a wonderful and supportive community on Facebook called The Nature Journaling Club.

These are experiences that I feel are calming, joyful, and help us to connect to the wonder of the world around us. As the result of a sketch I posted on social media, I was able to connect with a local organization to hopefully continue my journey as an environmental educator. A connection which is hopefully leading towards my first nature journaling class early next year.

So now I encourage you to grab a paper, a pencil (or pen), and go outside. Take 10 minutes…or 30… or an hour, and see what captures your attention and your curiosity. Use the balance of words, pictures, and numbers that works for you. And then keep going outside. Find that place that brings you peace, where you can connect to the world around you.

Want to learn more? Check out our series on starting a nature journaling practice!

Reflections on a First Attempt

This year for the end of the school year, I decided to try something different. Normally, I show a video or lead students in games, but I wanted to end this year with something they could take with them.

Something they could use…

I had recently attended the Wild Wonder Nature Journal Educator Workshop (HIGHLY recommend!!!) online and thought I would try sharing a little of that domain with my students. I had not drawn as much this year with them, due to the projects I took on and the general stress of teaching I was feeling.

I decided to adapt some of the lessons that John Muir Laws had shared during his presentations about how to approach teaching nature journaling – a fact which I mentioned in my slides (it is important to model giving credit for students). I went with the approach of encouraging students to record three types of information – words, pictures, and numbers – as they sat outside and observed.

Did the activity go as planned? – Nope… But did I learn some valuable lessons in the process? – Absolutely!

So here are a few of my reflections:

WHAT WORKED:

1. Give students the materials they need for the activity.

Anyone who has ever been a teacher knows that before you can get a student to do an activity, they need the materials to be successful. Most often, this is in the form of a pencil, which I admittedly bought a giant new box of for this activity. But to give students a place to journal and as a little end of year gift, I bought each of my students a little blank journal. Nothing too fancy, I opted for one with a basic brown cover so they could decorate it. The size/structure would probably depend on long term plans for the journal – Is it a one time activity? Or will students be using it throughout the year? And if so, how often?

2. Be prepared and be vulnerable.

Having a slide deck to work off of was really helpful, through I sometimes almost skipped ahead. With a topic like this, it is nice to have something they can see, in addition to what is being said. It also helped keep me on track, as I only had a set amount of time to complete the activity with my students.

I also thought it was important to show students that this was something that I practiced too. I shared a couple pages from a recent entry in my own journal, though I wish I could find my nature journal from when I was around their age so they could see that it is a practice that takes time. That it is not about drawing the perfect “pretty picture”, but about capturing the things that make us curious and what we learn and wonder about.

3. Get them outside.

I know it probably seems obvious, but for an activity like this to work, students need to be somewhere other than their desk. This was also a major reflection I had from running my school’s Outdoor School program, but you kind of need to not be afraid to have kids outdoors regardless of the weather (unless there is a health concern). I worried for a bit that my grand plans would be derailed by some unexpected rain after a hot weather spell, but I got lucky in the end.

There was also something a bit magical about seeing some of my students in a different setting. Or seeing a group of them lying on their stomachs in the grass debating how to best draw something. It didn’t click for all of them and some were definitely more into the activity than others, but it was a nice change.

WHAT WOULD I DO DIFFERENTLY:

1. I should have had them sketching or doing something active a lot sooner.

I spent WAY too long setting the stage during the activity and going over the background information I wanted students to know. Even in middle school, students can only take in so much without a little break. I think I should have given them their journals sooner (more on that later) and done some activities with them. One idea I had was to use a bird webcam (like one of those from Cornell Lab of Ornithology) or some photographs to have students practice using words, pictures, and numbers to communicate their learning.

I also think I should have spent some time showing them some skills that are helpful, like looking for basic shapes, how to sketch lightly and then go back to add details, how to deal with the inner critic (though I’m still working on this myself). Which brings me to reflection number 2.

2. One day/class period was not enough.

And in my district, Science classes are currently longer than most other classes. To do this work well, it takes time to build these skills and to build confidence in nature journaling. I think three days would probably be a minimum to start with, especially since no class immediately starts and you need time to meet students where they are. I think I probably would have broken it down as follows, if I had the chance to do this again:

Day one: Observation – what is it? How do we capture it? Maybe practice using a resource like this one that I have folded in the front of my own nature journal. And maybe some time to make their journal their own.

Day two: deep dive into words, pictures, and numbers strategies

Day three: questions – different types of questions, finding comfort without instant answers, question chains

And I think for it to be as effective as possible, students would need to get outside each day to work on the skills.

3. This would a great place to START a school year, not end it.

Observation and scientific communication are essential skills that take time and practice to hone. I wish I had started my year with an activity like this and had students work on these skills throughout the year within our curriculum. I think it would have led to a deeper understanding of some of the content we covered. And I think it is valuable to work on the practice of capturing how we see the world in different ways and sharing them with one another. There is so much we can learn from others and I wish I had brought that into my classroom more.

I also think it would be so valuable for students to have something they could use to track their growth, as scientists, artists, and naturalists.

FINAL THOUGHTS

Teaching, like nature journaling, is a learning process. I have yet to do a single lesson or activity that I couldn’t think of something to improve upon in some way. I also think that there is something to be said for adjusting to one’s audience. I would likely change certain aspects if I was presenting to adults, rather than 12 year olds. And I would definitely make shifts to work with a younger audience.

But ultimately, I think being present outside and having time to sit…to be curious…to try something different from the norm… are all valuable and so important to building a better tomorrow. And taking the time to appreciate the beautiful things today.

Why I chose to post art to Redbubble (and not on other sites)

Mt. Hood at Sunrise

Let me start out by saying that the thoughts below are my own opinion. It is important for artists to make their own decisions about where/when to post their art. This is simply a reflection on how I came to my choice. This also could change in the future (and I will do my best to update in future posts if that happens).

I am going to start by responding to the comment that seems to come up most often when I mention where people can find my art.

YOU SHOULD POST THIS ON ETSY.

So, I should probably start by saying that I do have an Etsy Shop, which as of the date this is published in currently empty.

I actually tried Etsy first. It definitely was the most familiar site for artists and I was already familiar with it as a buyer, so it felt like the best choice. I ordered a bunch of stickers with my artwork on them from Moo.com – at first so I could put them on my water bottle – but after some encouragement from friends, decided to order more. Dear reader, I still have almost all of them (the only exception is my first batch which I sold to a friend).

Once I had the stickers in hand, I set about taking pictures, writing descriptions, trying to figure out keywords, etc. I also paid my fees for each item. As of August 2022, Etsy charges $0.20 USD per item, a 6.5% transaction fee, and 3% + $0.25 USD payment processing fee (there is also a fee for ads if that is how a buyer makes their purchase). So with much excitement, I put them out into the internet.

And nothing happened.

So I tried what any artist would do: I went to Youtube and the blogs trying to figure out what I was doing wrong. I watched and read for hours, then proceeded to change my keywords, re-take photos, and edit descriptions.

I thought maybe my products weren’t up to par (someday I would like to make my own stickers, but I would need a serious equipment upgrade). So I tried adding a few more products using Printful’s drop shipping option. This was pretty cool in that I could now add clothing items to my little shop in a variety of sizes. But it still felt pretty limited. So I again paid the posting fee.

And again…nothing.

Now there is a chance that I could maybe make a sale or two now because I have created a lot more designs and have tried becoming more active on Instagram, FB, and Twitter. But as an artist just starting out, I’m still not sure of that.

I also started my Etsy shop around the time they launched the Star Seller program as well, which felt like an enormous hill to climb as someone who was just starting out and creates art after working a day job.

So after this initial disappointment, though with a few fun prints of my art along the way while learning Printful, I decided to try something else. Which brought me to Redbubble.

WHY I CHOSE REDBUBBLE

So now we get to the heart of this post, namely why I chose Redbubble over the other sites. Here are a few of my reasons:

1. Familiarity

This was definitely the main reason at the time. I had bought items from Redbubble myself previously, including from other artists I followed online. And the quality was pretty good. Also when I started checking out other artists posts on Instagram and Twitter, Redbubble showed up fairly often in bio links or as an item posted to a feed. Thus, from my own experience and observations of others, it felt like a safe choice.

2. Ease of setting up

As someone who creates art for fun, I needed a place to post my art that was easy to work with. Setting up a Redbubble shop was really easy. The only real issue I ran into was that names are limited to 15 characters (so my Redbubble is FernheartDesign). And adding designs was really easy as well. I could quickly add art from my iPad and edit the design’s title, tags, and description. Additionally once I had some designs on the site, I could copy settings to speed up posting similar artworks.

3. Availability of Options

After my frustration with Etsy and how limited it felt, Redbubble by comparison gave me a lot more options to display my designs on without a lot of extra work (or cost). After uploading a new design, I could add it to clothing, hats, bags, accessories, decor, and more. For each product type, I could edit the size/position of the image, along with background color and pattern for many products. I could choose which products I felt the design worked well on and those it did not. And this process was not time consuming. And since I have opened my Redbubble shop, the site has added new options for products and adding them to existing designs in super easy.

4. Cost

Not the biggest consideration for me, but cost definitely played a role. It was free to set up my Redbubble shop. Posting new art cost me nothing. I wasn’t charged for each new product type I wanted to offer my design on. And when adding a new design, you can select what you want your profit to be at (I think the default is 20%, which is typically what I aim for).

WHY I DON’T HAVE MY ART ON OTHER SITES

The answer to this really related to the reasons I already discussed. I don’t want to pay money to sell my work beyond what it costs to manufacture the items. I’m not as familiar with sites like Society6, Cafepress, and FineArtAmerica, which I know artists use, though I may expand to others someday. And where I am in my life right now, the idea of learning another website feels intimidating.

Though honestly, if I was to try something else, I would love to sell designs on my own website or in local shops. And if/when I make that shift, I will be sure to update on the process.

Finding a Niche

Like many artists, I think I am still finding my niche and art style.

When I first starting working on digital art, it was introduced to me through the concept of sketchnoting. For those who are not familiar, sketchnoting is the process of using icons/drawings to communicate information that has been learned. My first introduction was through trainings that were led by staff in the school district I work for. I quickly started practicing this outside of school with books I was reading.

This one from Michael Cohen’s “Educated By Design” is still one of my favorites (my non-art twitter handle is in the lower right corner – my art account is @FernheartDesign):

I spent a lot of time looking at The Noun Project for icon ideas for various topics and even tried live sketchnoting when attending the ISTE conference back in 2019 (my tip for anyone who has ever considered that is to create a general template in advance).

My early art is very icon heavy and simple. I recently came across one of the first tree designs I have drawn and it was VERY different from the work I do now. Next I got really into math-based art or working on icon based images that I could use in the classroom. This then led to creating custom banners for Canvas, the LMS that my school uses, which later lead to creating custom Google Slide templates (but that is for another post).

Somewhere along the way, I started getting interested in nature focused art. Which is nothing new. I have occasionally stumbled across sketchbooks from high school that show my early attempts at drawing jellyfish, seahorses, plants, squirrels, and more.

And it also was driven I think by the amount of time I started spending outside during the early days of the pandemic. The wooded parks and trails near my house gave me a place to relax and breathe. To start to notice the way that the forests and mountains change with the seasons. So I started trying to draw what I saw.

At first, I was very fixated on trying to create realistic digital art. Something that looked like the photos my friends and I took while out on walks. And I will admit that some of these early works are still some of my favorites. One subject seems to appear quite a bit: Mt. Hood.

As the highest point in Oregon, Mt. Hood is easily visible on clear days for miles and changes quite a bit with the light and seasons. I’ve found it to be a fun subject to experiment with different styles and Procreate pens. After my initial attempts to try to draw the mountain accurately, I started to take more of a sketch approach, trying to show light and shadow in a different way. Adding more pops of color.

This gave way to a series of sketches that showed various peaks of the Cascades. The Mt. Hood design was the first, followed by Mt. St. Helens and Mt. Rainier. It is still one of my favorite designs – currently my bestseller on Redbubble as well as printed on a poster that I have hanging in my classroom and on the t-shirt I am currently wearing. It has a little bit of science and a lot of color, which are both things that I am fond of. Even though I currently don’t get to teach about volcanoes.

I would later create an additional series that more of the mountain range from Mt. Baker in the north to Lassen Peak in the south. These ones were much more of an ink style drawing and likely the result of me trying to draw in ink on paper-based art.

The Cascades artworks have definitely been the most successful designs for me as an artist. And I know it’s kind of silly, but they follow a color gradient with reds to the north, oranges in the central range, and yellows to the south. The originals were in shades of blue and purple, but I think they turned out a bit too dark.

Around the same time, I started developing an interest in native plants. Growing up, I was often the kid with the guidebook out on hikes who attempted to identify every single tree, flower, bird, or bug I encountered. And when I had time, I would try to sketch them. I’ve been working on a series of ink-style drawings of the various native plants I observed on hikes this spring/summer. It has been interesting to try to start identifying plants not just by their flowers, but by their leaves. And trying to learn a lot of the vocabulary that goes along with that. I take my cell phone with me mostly for taking reference photos that I can later use.

And I know there are loads of other types of art themes I could focus on, but I really like my nature niche. It gives me a chance to learn more about and appreciate the ecosystem around me and the complexity of it. I’m sure I will find new aspects to capture with my art (or maybe someday finally get around to creating a coloring book from some of my designs). Which I will admit would be easier with my more recent sketch style compared to my earlier art.

I also think I would like to start sharing more of what I am learning along the way as part of my art. I did start adding scientific names to some of my designs and it has been interesting to start recognizing parts of these and the connections between plants/animals I never would have guessed were related to one another. But half the adventure of art is not knowing where it will lead you next. And that is part of what makes it fun.

Learning To Think Before You Ink

This October, a coworker of mine challenged me to try Inktober. I will admit that my first instinct was mild panic at the thought of:

  1. Drawing something everyday
  2. Using a prompt to guide what I was drawing
  3. Using ink

As with many experiences, I find it helpful to reflect on these thoughts after the experience.

1.Drawing something everyday –

Ok…I admit this was not the most terrifying part. But since returning to teaching full time, I have found my art ending up very much on the back burner. It feels like drawing once a week is a larger task than it was to draw more often just a few short months ago. I also have not found myself spending as much time outside as I did during the summer, and with that, less inspiration. It was nice in some ways to come home from work with the intention of making time for art again.

2.Using a prompt to guide what I am drawing –

One of the first things I did when my friend asked me about trying out the challenge was look up a prompt list. Some of them felt reasonable, like watch or compass, but others were much more difficult (collide???). And as someone who almost exclusively draws landscape and nature art, I immediately knew I would have to stretch myself. Though thankfully I did end up finding comfortable ways to approach some of the prompts like suit, helmet, and extinct.

3.Using ink –

Continuing the concept of being honest, this was the part that scared me the most. I’ve taken a number of art classes and own lots of fun drawing pens that I used to break out on occasion, but I’ve really found digital art to be my comfortable medium. For one thing, it is a lot less messy. I don’t like having ink all over my hands and I really don’t love cleaning up when I use lots of different colors of paint. But as I have previously admitted, I also like the ability to “undo” more of my work when working digitally.

Working in ink, I did not have that option. At first, I found myself making certain gestures that were familiar when drawing on my iPad (mostly holding my pen down to “correct) the shape), but after a few days, I found myself becoming more comfortable with making my choices ahead of time. That my hand felt more steady and confident. And I didn’t dislike the way some of the pieces turned out.

It was also fun to be able to see my art in a physical medium. Most of my pieces, I have only ever interacted with on a tablet or computer. There was something special about seeing the piece on paper. And that is also probably why I ended up buying more pens (I quickly found that I needed more than more line thickness to get the look I wanted).

I also found an unexpected additional joy along the way. This year, the art teacher at my school was doing Inktober with students. It was fun to see how they approached the prompts. To hear about which ones they found challenging and to see them trying new styles. I have since tried to bring more opportunities to draw into my classroom.

Needless to say, overall it was definitely a challenging learning experience, but a rewarding one as well. Sometimes it is good to step a little outside your comfort zone and try something new.

Reflections on Digital Art Learnings – July 2021

So today as I am wrapping up the month of July, I thought I would share a few reflections on some learnings from my digital art process using Procreate. And a recent pair of pieces provided the perfect opportunity.

So first here are the pieces, one a re-do of the other. The original piece is on the left and the second version on the right.

Both feature a fur seal pup sitting on a rocky beach and at quick glance, some of the differences may not be super obvious to an observer. But the process of making the changes led me to a few thoughts.

1) Starting with a sketch is really helpful
Yes, I know I already wrote a blog post on this exact topic, but I stand by it. Having a sketch gives me a starting point for the general shapes and even where I want to add some of the shading and details. But my final design doesn’t look exactly like what I started with.

2) Choosing the right brush can make a huge difference.
Recently, I have been drawing a lot of small, fluffy creatures (mostly because they are adorable). But admittedly, I had a tough time figuring out how to get the texture I was looking for. In the first attempt, the fur texture was created using the Dry Brush under Painting. It seemed to work alright, but I had a rough time blending the flippers into the body.
On my second attempt, I switched to the short hair brush under Touchups. I varied the color and size of the brush more as well. In fact, there were several layers with the brush strokes. I had been playing with the Touchup hair brushes when working on a rabbit drawing (the print is available in my Etsy shop) and liked how much softer it looked. I could also smudge the base color layer to help the flippers blend into the body layer a little better.

3) If I want to make changes, I don’t have to start from scratch.
This is still one of my favorite things about digital art. If I want to change a layer or a color, I can do that without completely starting over. With this piece, I was able to keep the background, but edit parts of the seal. Because I had combined some layers (more on that in a moment), I did have to re-do the whole seal, but was able to use original layers as a more detailed “sketch” to guide my work. I also added a few more details to the rocks and edited the shading to add more dimension. Though sometimes, I can barely notice those changes.

4)Details require a lot of layers.
So this might not be true for all digital artists, but I use a lot of layers when creating a piece. And one thing I occasionally bump into is the layer limit. For this 10×10 inch, 300dpi canvas, the limit was 55 layers. And for both of these pieces, I bumped up against this limit multiple times. So at times, I have to decide which layers to combine down and which ones to keep separate. It also might have something to do with how many layers were used just for the rocks (even after combining some down, there are still 13, not counting any of the other background elements).

And I know there is still so much to learn and continue to practice.